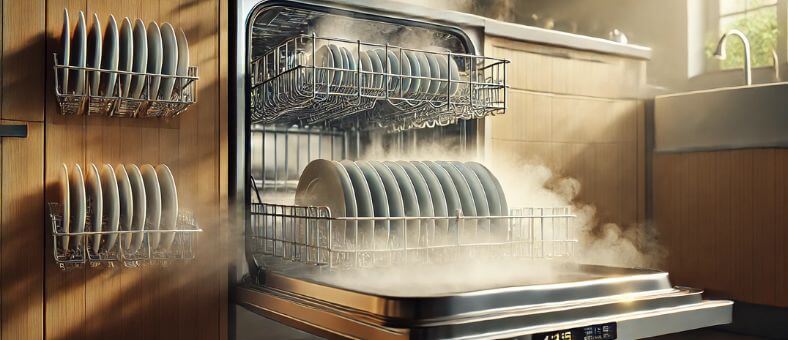

Imagine opening your dishwasher after a cycle and being greeted by dishes that sparkle like new, free from water spots and food particles. The secret to this consistently flawless result doesn’t lie solely in the detergent or the quality of your dishwasher—it’s in the cleanliness of the spray arms. These pivotal components are the heart of your dishwasher’s cleaning power, propelling water to every corner, but when clogged, they can significantly diminish the efficiency of your machine.
Understanding how to clean dishwasher spray arms is not just about maintaining the aesthetic appeal of your dishes; it’s about enhancing the performance and longevity of your appliance. A well-maintained dishwasher means fewer repairs, better energy efficiency, and a superior clean that you can rely on meal after meal.
Remember that this isn’t just about a one-time sparkle. It’s about transforming your routine and ensuring that every dish you wash is a testament to the health and hygiene of your kitchen. So, roll up your sleeves, and let’s embark on this journey of discovery and cleanliness together. By the end of this guide, you will not only have mastered the art of cleaning your dishwasher spray arms but also take pride in the brilliance that comes with every wash cycle. Let’s start!
Dishwashing Performance
Studies show that well-maintained dishwasher parts can lead to 30% better cleaning performance, ensuring spotless dishes every time!
Table of Contents
Dishwasher Cleaning Kit Essentials
Before cleaning your dishwasher spray arms, gathering the right tools and materials is essential for an effective and efficient cleaning process. Here’s a simple list of what you’ll need to ensure you’re fully prepared to tackle the job:
- Warm Water and Baking Soda: A natural and gentle solution, perfect for most cleaning tasks.
- White Vinegar: Excellent for cutting through mineral deposits and grime.
- Small Brush or Toothbrush: Ideal for accessing and cleaning tight spaces within the spray arms.
- Toothpick or Piece of Wire: Useful for clearing out debris from the spray arm holes.
- Screwdriver: You may need to remove the spray arms, depending on your dishwasher model.
- Soft Cloth or Sponge: For wiping and drying the spray arms once they’re clean.
- Towel: Place this under the parts as you work to protect both the countertop and the dishwasher components.
Disassembling Dishwasher Spray Arms: A Step-by-Step Guide
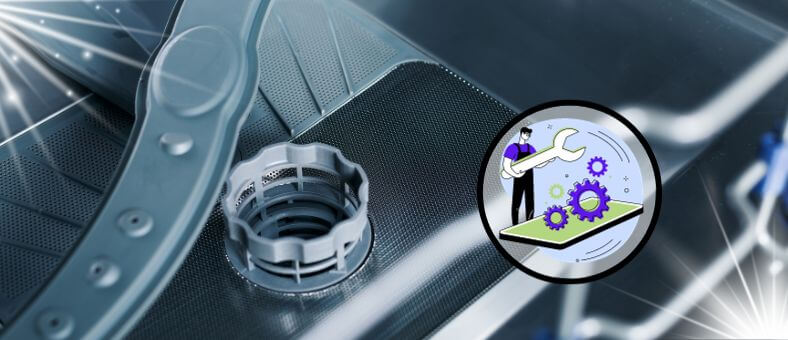
Disassembling the spray arms of your dishwasher might sound like a task for a professional, but with a bit of guidance, you can do it yourself with confidence. Here’s a straightforward, step-by-step guide to help you through the process:
Step 1: Safety First
Before you begin, make sure your dishwasher is off and completely cool to the touch. Unplugging it from the power source is a good idea to ensure your safety.
Step 2: Remove the Bottom Rack
Slide out the bottom rack of the dishwasher to clear your workspace. This will give you unobstructed access to the lower spray arm. If you’re curious about the types and care of dishwasher racks, be sure to check out our comprehensive guide, All About Dishwasher Racks, to ensure you’re fully informed on maintaining every aspect of your dishwasher’s interior.
Step 3: Detach the Lower Spray Arm
The lower spray arm usually snaps off or is fixed with a simple nut or screw. Gently rotate the arm or the securing mechanism, and lift the arm away from the dishwasher floor. If it’s held by a screw, use your screwdriver to carefully remove it, and keep it somewhere safe—you’ll need it for reassembly.
Step 4: Access the Upper Spray Arm
Next, look up. The upper spray arm may be attached to the dishwasher’s ceiling or the middle rack. If it’s on the rack, you’ll need to remove the rack by unhooking the end caps or removing any screws that hold it in place.
Step 5: Remove the Upper Spray Arm
Like the lower arm, the upper spray arm will snap off or be secured with screws. Handle it gently as you detach it, making sure not to force any moving parts.
Step 6: Check for Additional Arms
Some dishwashers have a middle spray arm or additional nozzles. If yours does, repeat the same gentle detachment process.
Step 7: Inspect the Arms
Once removed, inspect the spray arms for any signs of wear or damage. If a spray arm is damaged, it may need to be replaced to ensure your dishwasher works efficiently.
Deep Cleaning Techniques: Scrubbing Away the Grime

Now that you’ve successfully disassembled the spray arms from your dishwasher, it’s time to tackle the grime. A deep clean will not only help achieve that perfect shine but also improve the efficiency of your dishwasher.
Let’s get started with some simple yet effective deep-cleaning techniques.
1. Soak to Loosen the Grime
Begin by submerging the spray arms in warm, soapy water. If you can, use a basin or a sink for this. A squirt of dish soap and the natural heat of the water work wonders in loosening the gunk that’s built up. Let them soak for at least 15-20 minutes. You can add a cup of white vinegar to the mix for an even deeper clean. Vinegar is excellent for breaking down limescale and mineral build-up.
2. Scrubbing the Small Holes
After soaking, take a small brush or an old toothbrush and gently scrub the holes in the spray arms. These tiny openings can get clogged with food particles and minerals, so pay extra attention here. If you find any stubborn blockages, a toothpick or a piece of wire can be used to carefully dislodge them. Be gentle to avoid damaging the arms.
3. Rinse Thoroughly
Once you’ve scrubbed the grime, rinse the spray arms under running water to wash away any loose debris and soap residue. Make sure the water flows freely through all the holes. This is a good sign that they are clear and will function properly when reattached.
4. Dry and Inspect
After rinsing, shake off any excess water and dry the spray arms with a soft cloth or towel. Once they’re dry, hold them up to the light to ensure all the holes are clear. If you spot any remaining blockages, return with your toothpick or wire to clear them out.
The Hidden Culprit: Clogged Arms
A clogged dishwasher spray arm can decrease your machine’s efficiency by up to 50%, leading to lackluster dish cleaning.
Reassembly: Putting Your Dishwasher Back Together
Reassembling your dishwasher after a thorough cleaning is the final step in ensuring a dazzling finish for your dishes. This process is straightforward, but it’s essential to approach it with the same care and attention you used during disassembly and cleaning. Let’s walk through the steps to put your dishwasher back together.
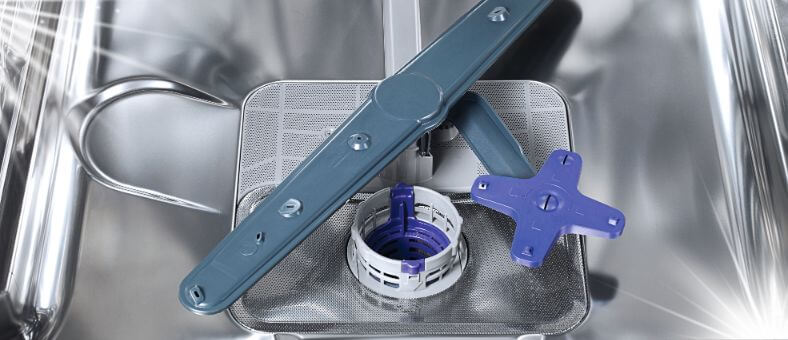
Step 1: Position the Lower Spray Arm
Take the lower spray arm and place it back at the bottom of the dishwasher. Make sure it’s seated correctly in its designated spot. Double-check that it’s appropriately aligned with the connection point if it feels loose or wobbly.
Step 2: Secure the Lower Spray Arm
If your lower spray arm was held in place by a nut or screw, now is the time to reattach it. Tighten it by hand to avoid stripping the threads. If it snaps into place, listen for a click to ensure it’s properly secured. Give it a gentle spin to ensure it moves freely—this is crucial to function correctly during a wash cycle.
Step 3: Reinstall the Upper Spray Arm
On the upper spray arm, align it with the mount on the dishwasher’s ceiling or the middle rack, depending on your model. If it screws in, carefully thread it by hand and tighten it to the point of resistance. For snap-on models, gently push it into place until it’s firmly attached.
Step 4: Check the Middle Spray Arm
If your dishwasher has a middle spray arm, it is time to reattach it, following the same steps as the upper spray arm. Ensure it’s properly aligned and secured so that it doesn’t obstruct the movement of the racks.
Step 5: Replace the Racks
Slide the racks back into the dishwasher. If you had to remove the top rack, ensure the end caps or any retaining mechanisms are securely fastened to prevent the rack from coming off its tracks.
Step 6: Give It a Test Spin
Before you close the dishwasher door, manually spin the spray arms to ensure they have full clearance and aren’t hitting any racks or dishes. They should rotate smoothly without any hindrance.
Step 7: Final Inspection
Do a quick visual inspection to confirm that everything looks good and is in place. It’s better to catch any issues now than to discover them after you’ve started a wash cycle.
Step 8: Plug It In and Run a Test Cycle
Once you’re confident everything is assembled correctly, plug your dishwasher back in. It’s a good idea to run a short wash cycle while the machine is empty to ensure that the spray arms are working as they should and that water is being distributed evenly.
Maintenance Tips: Prolonging the Life of Your Dishwasher Spray Arms
Maintaining your dishwasher spray arms isn’t just about keeping them clean; it’s about extending the life of an essential component of your dishwasher. Here are some straightforward maintenance tips to ensure your spray arms continue functioning effectively, providing you with the best possible performance from your appliance. For more detailed strategies on keeping your dishwasher in top shape for years to come, don’t miss our guide on How to Extend Dishwasher Life.
Regular Checks
Make it a habit to inspect your spray arms periodically. Look for any signs of wear or damage, and check that the spray holes are clear of debris. A quick inspection every month can prevent bigger issues down the line.
Gentle Cleaning
After every few wash cycles, take a moment to wipe down the spray arms with a soft cloth. This can prevent the build-up of minerals and grease. For a more thorough cleaning, a mild vinegar solution can be used to wipe the arms, helping to dissolve any deposits. If you’re looking for more comprehensive steps to keep your dishwasher in pristine condition, be sure to check out our guide, The Easiest Way to Clean a Dishwasher, for handy tips and tricks.
Avoid Hard Water Build-Up
If you live in an area with hard water, consider using a water softener or a dishwasher salt. Hard water can lead to limescale build-up, which clogs the spray arm holes and affects the water pressure. Keeping limescale at bay is key to maintaining the efficiency of your dishwasher. For more insight into how hard water can affect your appliance and ways to combat it, delve into our article on Dishwasher Problems Caused by Hard Water.
Load Your Dishwasher Correctly
Improper loading can lead to dishes blocking the spray arms, preventing them from rotating and doing their job. Always load the dishwasher according to the manufacturer’s instructions to ensure nothing obstructs the spray arms. For a step-by-step guide on how to optimize your dishwasher’s performance through proper loading, take a look at our resource, How to Load Your Dishwasher Properly.
Use the Right Detergents
Some detergents are harsher on dishwasher components than others. Use a recommended dishwasher detergent and ensure you’re using the correct amount. Too much detergent can leave residue, and too little won’t clean effectively. To discover which detergents are best for your machine and get the most out of every cycle, check out our guide on What is the Best Dishwasher Detergent.
Regular Deep Cleans
Every few months, give your dishwasher a comprehensive clean, following the steps you’ve learned for cleaning the spray arms. This not only keeps the spray arms in good condition but also helps maintain the overall health of your dishwasher.
Be Proactive with Repairs
If you notice something needs to be corrected with your spray arms, don’t wait for the problem to worsen. Addressing issues promptly can prevent costly repairs in the future.
The Hidden Culprit: Clogged Arms
A clogged dishwasher spray arm can decrease your machine’s efficiency by up to 50%, leading to lackluster dish cleaning.
Troubleshooting Common Issues During Cleaning
Even with the best care, you might encounter common issues when cleaning your dishwasher spray arms. Don’t worry, though—most of these problems have simple solutions. Here’s how to troubleshoot them:
Clogged Spray Arm Holes
- A common issue is where debris blocks spray arm holes, preventing water from cleaning dishes.
- If soaking and scrubbing don’t clear the blockages, use a toothpick or fine wire to remove debris without damaging the holes.
Spray Arm Not Spinning
- This could be due to obstructions or a malfunction. Check if dishes are blocking its path.
- Inspect for damage; if none, the problem might be with the water pressure, potentially requiring professional help.
Water Leaks Around the Spray Arm
- Leaks may indicate the spray arm is not properly seated, or the seal is damaged.
- Ensure the arm is correctly aligned and secured. Replace the seal or gasket if leaks continue.
Poor Cleaning Performance
- If dishes remain dirty post-cleaning, check other components, like the filter and drain, for blockages.
- Verify proper dishwasher loading and appropriate detergent use to ensure optimal water circulation.
Discoloration or Mineral Build-Up
- Hard water can cause white residue or discoloration on spray arms.
- Soak the arms in a vinegar and warm water solution to dissolve deposits. For stubborn build-up, use a commercial descaling product.
Spray Arm Seems Loose
- Ensure the spray arm is installed correctly according to the dishwasher model’s specifications.
- Check if the retaining hardware is worn and consider replacing it if it remains loose.
Final Touches: Testing for Performance After Cleaning
After you’ve put in the effort to clean and reassemble your dishwasher spray arms, it’s essential to ensure everything works correctly. Testing the performance of your dishwasher after a thorough cleaning is a simple but crucial step. Here’s how to do it:
Run an Empty Wash Cycle
Start by running an empty wash cycle on your dishwasher. Choose a short cycle to save time and water. This initial run will help you ensure that the spray arms are installed correctly and that water is distributed evenly without leaks.
Listen for Unusual Noises
As the dishwasher runs, listen for any unusual sounds. Squeaks or grinding noises could indicate that the spray arms are not rotating freely. If you hear anything out of the ordinary, it’s best to stop the cycle and inspect the arms again to make sure they’re properly secured and that nothing is obstructing their movement. Should you encounter a persistent buzzing noise, our article on Dishwasher Making Buzzing Noise may help you diagnose and resolve the issue.
Check Water Coverage
Once the cycle is complete, open the dishwasher and check for signs that the water has reached all areas inside the machine. Look for an even distribution of moisture. If there are dry spots, the spray arms may not function properly.
Inspect the Spray Arm Movement
With caution, you can interrupt a cycle mid-wash to open the door and check if the spray arms are moving. Most modern dishwashers pause automatically when the door is opened. This is an excellent way to visually confirm that the spray arms are spinning as they should.
Examine the Cleanliness of the Interior
After the empty wash cycle, inspect the interior of the dishwasher. It should look clean and free from soap residue. If you notice soap buildup or spots, it could be a sign that the spray arms are still not clean enough or that there’s an issue with the water quality.
Perform a Loaded Wash Test
For the ultimate test, run a complete cycle with dishes. Make sure the dishwasher is loaded according to the manufacturer’s guidelines. After the cycle, check your dishes and utensils. They should come out clean and free from any food particles. If they’re not, it might be time to troubleshoot further or consult with a professional.
Wrapping Up: How to Clean Dishwasher Spray Arms
And there you have it—a sparkling clean dishwasher ready to tackle anything you throw at it! The satisfaction of seeing your dishes emerge spotless and gleaming after each cycle is truly unmatched. Remember, the heart of your dishwasher’s performance lies in the diligent care of its spray arms.
Don’t let a little grime stand in the way of pristine plates and shimmering glassware. Embrace the sparkle and let your dishwasher do the heavy lifting. Your dishwasher deserves the best, and so do you. Keep it running like a dream; your dishes will thank you after every meal!
Ready to enhance your dishwasher’s performance? Check out our recommended dishwasher spray arms on Amazon and discover the perfect match for your appliance. Upgrade today for a sparkling clean with every wash!
At WashDryDazzle, we’re devoted to furnishing you with crucial insights to optimize your dishwashing experience. Explore our extensive Dishwasher Accessories repository for detailed guidance.
Frequently Asked Questions(FAQs)
Why do dishwasher spray arms get clogged?
Dishwasher spray arms can get clogged with food particles, mineral deposits from hard water, and detergent residue. Over time, these can block the tiny holes in the spray arms, preventing water from spraying effectively.
How do you unclog a spray arm?
To unclog a spray arm, remove it from the dishwasher and soak it in warm, soapy water. Use a soft brush to clean the holes, and for stubborn clogs, gently use a toothpick or a piece of wire to dislodge debris. Rinse thoroughly before reattaching to the dishwasher.
How can I determine if my dishwasher’s spray arm is faulty?
If dishes remain dirty after a cycle, water isn’t coming out of the spray arm holes, or the arm doesn’t spin freely, it might be clogged or damaged. Cracks or significant wear on the spray arm can also indicate it’s time for a replacement.
Is it normal for the spray arm of a dishwasher to be loose?
No, a dishwasher spray arm should not be loose. It should be firmly attached but able to rotate freely. It may not spray water effectively if it’s loose, leading to poorly cleaned dishes. Check if it needs to be snapped back into place or if a component is worn out and requires replacement.